Tuesday, August 30, 2011

Tuesday Tutorial: homemade buns and honey cinnamon spread

Baking bread from scratch can be a little scary.  You have to get the yeast right temp and the dough right consistency and then you have to trust that it will all raise and look just right.  Confusing right?  Well this past weekend I tried this recipe that is supposed to be like the Texas Roadhouse rolls.  It wasn’t so bad for a first try.  The best part though…the honey cinnamon spread.  You might want to try the rolls out just for that!

The first step for making any yeast bread is you have to get the water the right temp.  Most packages of yeast will tell you it has to be 120-140 degrees.  Now, you can get out the candy thermometer and measure, or you can do like I did here and microwave the tap water for 30 seconds.  It turned out the same for me.  Proofing the yeast means you mix together the water, sugar and yeast and then let it rise until it doubles.  It probably more than doubled by the time I was done, but I did know that my yeast was working!  During this time I also scaled my milk…that means you cook it on high ‘til you start to see a few bubbles like it may boil anytime, and then you take it out and let it cool for awhile.  You can speed that up by putting it in a different container so that it’s not sitting in the hot pan.  I waited about 15 minutes to let it cool and it worked well!

Meanwhile you mix up your other ingredients with just enough flour to make it like a pancake mix.  For me this was about 3 cups.  Let that sit a bit to bubble up a little too.

random 035


Then, start to add more flour, about 1 cup at a time until you get a nice dough that flops around and twists on the dough hook.  You could knead it, but seriously, with those nice mixers out now days, why! I just kneaded it for 3 minutes with my wonderful mixer and it looked beautiful!

Granted, the down side is that adding flour at a high speed with the dough hook is that it makes a huge mess.  Maybe turn it down a little until the flour is mixed well before you get to those higher kneading speeds.  Other tip is to make sure you lock it down and hold on to it, else it may jump off your counter!

random 041

Then you let that dough raise until it’s doubled in size or more, takes over an hour.  Hardest thing here is getting a nice warm environment.  I usually set mine on the stove, and since it is summer it works good.  In the winter this can be a little tricky and I sometimes have to turn the oven on below to keep it warm since I have a ton of windows in my kitchen. 

random 075

When it is raised, you have to make a bun.  Can be tricky, but here you can see I stuffed a bunch of dough in my hand and forced it out between my thumb and index finger to a little bigger than a golf ball size.  Then, pinch it off.  I had to divide my dough into about 5 lumps here. 

random 076

Next comes letting the bread raise and bake, the best part!  The come out beautiful, make sure you put a little butter on top to make it extra good. 

Then comes the butter.  My daughter had to help me with that, she thought it looked good.  As you can see from her fingers in the bowl, it was!

random 084 random 085 random 087 random 088

Enjoy!  Here’s the recipes for you!  Hope you have fun…just make sure to clear a few hours to work on this.  The time will be well worth it!


1 pkg. active dry yeast

1/2 cup warm water

2 cups milk

1/2 cup sugar

6-8 cups flour

2 Tbsp. melted butter

2 whole eggs

2 tsp salt

Activate yeast in warm water with a tsp. of sugar.

While yeast is activating, scald milk and cool to lukewarm.

Once yeast has doubled in volume, add yeast, sugar, and milk to a large bowl and enough flour to make a medium batter. (medium batter is about the consistency of pancake batter). Beat thoroughly. Let stand alone until light and fluffy.

Add melted butter (which has been cooled), eggs, and salt. Beat well. Add enough flour to make flour to form soft dough.

Sprinkle small amount of flour on counter and set down on it to rest. Meanwhile, clean out the bowl and grease clean surface down with crisco. Place dough in bowl and flip over to grease the top as well. Knead dough until smooth and satiny.

Cover and let rise in a warm area until double in size.

Once double in size punch down. Turn out on floured board. Divide into portions for shaping and let rest for 10 minutes.

Once dough has raised, shape dough into desired forms. Place on greased baking sheets and let rise until doubled.

Bake at 350 F for 10-15 minutes.

HONEY CINNAMON BUTTER

1/2 cup butter

1/2 cup powdered sugar

1/2 cup honey

1 tsp. cinnamon

Blend all ingredients together at room temperature.

Spread on rolls

Love the update?

I thought we could use a little update to make this more sassy!  Wait for more improvements in the future as we learn more about this advanced blogging thing!  Tuesday tutorial is on its way...just need to get it to upload off my computer at home yet! :)

Saturday, August 27, 2011

Buy it now link for More Headwear


style
specify colors


More headwear!!

Let me introduce you to a few new products we will be selling:

First we have "Priscilla"  a headband made with rolled flowers and a spot of bling... The picture does not do justice to the fact that there is some sheer ribbon included, which is frayed for that "shabbychic" look!

We are right now ready to go with teal, pink, white, and plum... However, let us know and we can order supplies for the color of your choice!  This is selling for only $9.00! 


Next we have Anne- a petite little headband with 3 tiny flowers, and some lace/velvet accent.  This little sweetie will be sold for 11.00!

Isn't she going to be cute for baby pictures or that special occasion?  We can offer these in purple, pink, and black.  Anne can be sized to fit size infant-adult!

Next is Trebella, 3 rolled flowers clustered together on a removable clip- wear alone, on a beanie, or attached to your favorite headband! Sky's the limit with the number of color combinations we do here!  We're listing Trebella for $9.50

Maggie is a sweet beanie and floral clip.  We've been selling these flowers for awhile now, they go for $8.00, but we are excited to now add the beanies!.  All together, Maggie will be listed at 13.00.  Again, please just let us know what color you'd like your hat/flower, and we'll do our best to help you out!

And last but not least, we have this sweet satin flower we like to call Julia.  Julia comes on a clip and can be your's for $8.00.


Here's a buy it now link or you can contact us at sisterssassycrafts@gmail.com

Tuesday, August 23, 2011

Tuesday Tutorial-ish

Well, with me on vacation and my kids starting school, and Jackie doing her canning and being a "ref-widow", we just weren't able to come up with a "real" tutorial this week!  SORRY!  Maybe Jackie will be able to come up with something for getting ink out of pants, but so far nothing is working!  I did want to share a few factoids that I learned this past week, instead:

1.  The BUTTER COW at the Iowa State Fair is 100 years old.  It was interesting to see... more impressive was the sand sculpture tribute TO the butter cow, which was on display elsewhere at the fair.  This was at least the size of my living room... talk about a "sand castle"... we were pretty impressed!  Also inspiring was the fried candy bars we got at the fair (OK, honestly I thought they were gross, but my kids liked them...)  We weren't brave enough to try the fried butter.

2.  Witch Hazel, like Crisco, can be used for a large variety of things.  GOOGLE it!  I did!  Long story short, Crisco is good for all sorts of moisturizing, and can also be used to lubricate things like bolts that are stuck.  (oh, and frying chicken!)  I was inspired to search this after watching the HELP.  (Incidentally, a very good movie, stays true to the book... read it, then watch!)  Witch Hazel is good for soothing things, as well as reducing swelling, irritation, and redness... uses include treating bug bites, acne, diaper rash, etc.  Our Sassy Stylist inspired that one!

3.  Dryer sheets, apparently, can be used for all sorts of things, too... I stumbled on this while I was searching the facts about Crisco and Witches Hazel. Tips include using it to scrub shower doors, and also to help get rid of stuck on crud on dishpans... check out this link for more information!  I'm a little sorry that I switched to dryer bars awhile back, now that I've found uses for those annoying things!

OK, I've shared some tips that I've learned this week.  Why don't you guys provide us with some tips this week, too!  Share your favorite household tip via comment below!  We're all busy and can use some fun time saving tips that we can share! 

Once again, sorry we don't have a formal tutorial today, thanks for understanding, and sharing your tips with us!

Monday, August 22, 2011

Upcoming EVENTS!

I'm so excited to announce that in the near future Sister's SassyCrafts will be hosting some craft classes.  Right now we are thinking about classes such as:

 Introduction to the Cricut (basic how to projects for those who are new to Cricut, Interested in purchasing a Cricut but wanting to know more about it, or just those looking for a fun time out!)  A time where you can bring your cricut to learn how to better use it, or come and try one out!

Cricut Crafts: crafts using the Cricut that would be for intermediate/advanced Cricut users (Vinyl, detailed projects, etc).

Card Make and Takes: come for an evening, we'll provide you with materials, tutorials, and time to make several types of crafts such as thank you cards, birthday cards, sympathy cards, post-it note holders, etc.  NO CRICUT needed for these classes.

Prices for these classes will be reasonable, based on supplies, etc.  We'll have more information about this once we have classses better planned.

Right now we are checking to see interest in these classes.  Please comment below or send us an email at sisterssassycrafts@gmail.com and let us know what you're interested in (if you want to learn how to do something else we haven't mentioned, let us know that too!  I'd love to teach you how to knit, for instance!).  Let us also know things such as logistics of when you'd prefer to take the class (weekend/weekday), and time (evening, Saturday afternoon) etc. 

Once we know more information, we'll post details of these upcoming events.

Also, to let readers know, these classes will only be available in the Northwest Iowa area at this time!

Saturday, August 20, 2011

buy it now- petite flower headband

Here's the link:


specify color

Petite flower headband

Ever since I saw this headband, I knew I wanted to make it.  I finally got one done just now and was so excited I took a picture and am putting them up for sale!  $7 each, Jeana will get a paypal herebuy it now.  They are absolutely precious!  Email me a size and whatever color you want.  My personal favorite of course is the all white but I am sure the pink and light purple would be precious too!  Check out Caitlyn tomorrow, I’m sure she’ll be wearing this! (of course if I can get her to sit still long enough to convince her it’s pretty and don’t touch!)
They come in sizes newborn through adult and I just love these precious little things!
  girls and guns 012girls and guns 013

Wednesday, August 17, 2011

Monkey Business

A little Monkey I know is going to be turning 3 soon!  Her mommy asked me to design some things for her birthday, which we thought we'd post and share here.  SO, to get started, I have the party invitations which were personalized just for her!

These invitations are handmade, paper layerd invitations custom made for this occasion, not just some print out!   It's hard for me to decide what I like better, the animal print background or the bling flower bow (guess what, I am going to be custom designing a bow for the birthday girl's hair, to coordinate!)

Like what you see?  Sisters Sassycrafts can create personalized invitations for your special occasion.  While these invitations are perfect for a little girl's jungle party, we can custom design invitations to fit your desired theme, color, etc.  Please email use at sisterssassycrafts@gmail.com and we'll work out the details of your order!

Thanks for looking!

Tuesday, August 16, 2011

Tuesday Tutorial- Shower Head Cleaning

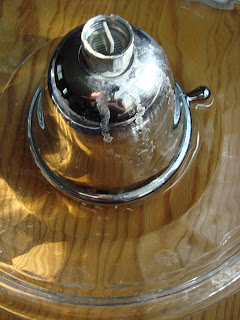
Today's Tutorial is more of an experiment.  I've noticed that our shower head was looking pretty gross,


and thought it would be fun to do a tutorial on cleaning this.  I've tried cleaning it by just spraying it with whatever I use to clean the shower, and that wasn't cutting it.  So, on to the trusty Internet I went!  I liked the recommendation to try to use vinegar to clean it!

So, the next step was to unscrew the shower head, which was surprisingly easy for me.  Then, I just put it head down into a bowl, and filled with vinegar until the head was covered... you can't really tell from the picture, but that's what's going on.

Next, I waited.  This was the easy part.  I put the bowl in the tub, made and ate supper, spent time with the family, and two hours later, TA-DA!

All I had to do is rinse and wipe with a sponge.  It was quite easy.  There are some scratches on the shower head, and the pictures don't do it justice, but, it was much MUCH cleaner than before.  I am convinced that this is a winner!

Meanwhile...
Shortly after beginning my experiment, I was talking to our Super Spunky Sassy Sister-in-law, who happens to be on maternity leave.  She's getting a little bored at home, even though baby's only about a week old. Unfortunately, she had no idea what "Tuesday Tutorial meant, since she hasn't BOTHERED to check out our BLOG yet!!!!   SHAME SHAME SHAME!!!!  OK, we'll forgive her, but only because our sweet  sassy niece is so cute!  (She does follow us on facebook... which is also in her favor!  BTW, did you KNOW you could follow us on facebook?)  I was telling her of my adventures in vinegar, and she was sad to say that her shower head wouldn't screw off.  As we were talking, she remembered that Ketsup contained lots of vinegar and other acidic materials.  She also remembered that Ketsup would take crud off pennies and make them all shiny!  So, needless to say, she decided that she would do her own experiment, and send me pictures!

So here's some shots of her adventures!

before....

covered in ketchup... got fries??


after... note the shine
 Spunky Sassy Sister in Law said that she actually did 2 applications, waiting about 1/2 hour between each... She said she just wasn't patient enough to wait to see what happened!  Needless to say, first application wasn't enough!  I think would have had favorable results if she had waited 1-2 hours before rinsing/wiping off the ketchup! 

Happy Adventures!

Saturday, August 13, 2011

Crochet Hats to keep you warm for fall and winter!

So here is an adorable hat that we are making for actually the whole family!  Granted, for the guys we’d do it in another color and without the flower, but for the girls it is fun to have a little bling!  Available in any color combo (yes, we can do you favorite team or even camo!) with 0,1 or 2 stripes.  Just email me at sisterssassycrafts@gmail.com and we’ll work out a deal.  Prices vary from $15-20 depending on size.  Available in size newborn through adult!  Keep tuned, more hats to come soon!  I just have to have a model who will sit still enough :)

Blooming bows

We've got flowers blooming all over here at sisters sassycrafts!  These flowers are so sweet tucked behind an ear, accenting a ponytail or updo, or clipped to your baby's headband or hat!

They also make the perfect accessory for a wedding or other special occasion! 
sorry this picture is so blurry!  It must be because it hurt my eyes to look at it!  Please appreciate the fact that this bow
was very painful for me to make... I bled red and gold the entire time!  Ha!  It did turn out cute, even if it was the
wrong colors!


Contact us at sisterssassycrafts@gmail.com to order your flower today.  Because they're generally
special order, I'm not going to post a paypal link, however, I think I can bill you through paypal if you're interested in that!  Prices start at $5.00 and go up depending on size and material.

Have a fantastic Saturday!

Tuesday, August 9, 2011

Tuesday Tutorial: Chocolate Chunk Peanut Butter Swirl Fudgy Cookies

 
We all love cookies, and chocolate chips, and peanut butter.  Here we’re combining all 3…and trust me, it is good!  My kids and husband have devoured half the cookies already and I don’t even have the 3rd batch out yet!   These cookies really are quite simple, just watch the pictures and hopefully you’ll see how easy it is!   Yes, it will ruin your diet, but make it on the weekends.  They’re for splurging.  Or Tuesday, cause we all know about fat Tuesday, or Wednesday cause it’s hump day or Monday cause we all need a little extra boost on Monday or Thursday cause it’s my afternoon off and you all should celebrate with me or really, any day, cause there is always some excuse to eat a really good cookie!  Just make sure you have it with a big glass of milk cause we all know that anything you have with milk cancels out all calories, at least that is my excuse and I’m sticking to it so I can have another one of these before my family eats them all!
chocolate chunk cookies 006

1 cup creamy peanut butter

2 sticks softened butter

1 cup granulated sugar

3/4 cup packed light brown sugar

2 large eggs

1 tablespoon pure vanilla extract

1 3/4 cups all-purpose flour

1 teaspoon baking soda

1/2 teaspoon kosher salt

2 cups chocolate chunks or chips

1 cup cocoa powder

1. Preheat oven to 350 degrees F.
2. Place peanut butter into the freezer until firm, about 30 minutes.
3. In a stand or electric mixer, beat butter and sugars until well combined. Add eggs and vanilla, beating until well combined.
chocolate chunk cookies 003
4. Place flour, baking soda, and salt into a large bowl. Add to wet ingredients along with cocoa powder, and chocolate chunks, slowly mixing until just combined. Drop dollops of frozen peanut butter into dough and turn mixer on for just a few turns of the mixer to get swirls of peanut butter through the dough. With a medium cookie scoop, scoop dough out and divide dough in half .  Put torn edge of half of the ball onto the cookie sheet and top that with other half, torn edge down (see picture). 
chocolate chunk cookies 009
Dough should be about 1 inch apart from each other. Bake for 14 to 16 minutes, until cooked through. Let cool on baking sheet for 5 minutes before transferring to a cooling rack. Serve with milk.
chocolate chunk cookies 002
Makes 3 dozen cookies

Sunday, August 7, 2011

handmade sash

I created this as a special order to a photographer we know.  
Decided to post this as a way for her to "preview" as well as for others to enjoy.

If interested in ordering one for your special occasion, photo shoot, or just
for fun, please contact me at sisterssassycrafts@gmail.com to work out details such as
colors, size, price, etc.

Thanks for looking!

Thursday, August 4, 2011

Ready for football season?

Here’s our team headbands…in Iowa State, Hawkeyes, and Huskers.  If you don’t see your team, just ask!  I  have even been able to find a few NFL teams too!  These headbands are done in the non-slip velvet and are great to wear with that ponytail when you’re out at the game.  We can do them in your school colors too, I have color choices like black and yellow zebra, orange and black zebra, green and white zebra that would go great at your high school!  Let us know what you want, we have cheetahs and sequins and lots of other fun options too!

sports 003

Order yours today so they’re ready in time for the big game!   They’re only $5 each and can be customized to fit your little one!  Click on this link and comment to us what you want!   Stay in place headband  Or, if you have any questions about what we have, just email us at www.sisterssassycrafts.gmail.com

Tuesday, August 2, 2011

Tuesday Tutorial.... Wrinkle Releaser!!!!

I love, love, LOVE wrinkle releaser.  Unfortunately, when you have a family of 4 using it on  ALMOST EVERYTHING, it gets kind of spendy...

My Darling Husband suggested that maybe I cut down or stop buying it, but I just can't give it up... so I had an ah-hah! moment one night... Figure out how to make it myself!!!

As with almost everything I decide I'm going to learn how to make, I searched the internet for recipes.  After reading about 10 recipes/suggestions, this is what I came up with:

Supplies:


Spray  bottle - there are several options for this.  My original recipe is to use the original wrinkle releaser bottle... this is about 33 oz.  But for those of you who do NOT have an original bottle, I also will include instructions for a smaller size (16 oz)
funnel (handy for pouring ingredients into the bottle (optional)
-. bottle of liquid fabric softner, any size, scent, brand.  I use the generic brand from Target.
-  water

1.  Start out with an empty spray bottle.  Make sure it does the wide "mist" spray!
2.  If you are using the big 33 oz bottle, pour in 1 capful of fabric softner.  If you are using the 16 oz bottle, pour in 1/2 a capful.


3.  Fill the rest of the bottle with water
4.  put lid on and shake


That's it!  You now have a handy dandy bottle of wrinkle releaser!


NOW, for those of you who have never been introduced to the magic of wrinkle releaser, this is how you use it.
1.  start with wrinkled clothing.  If you haven't done so already, test an inside, unnoticable piece of fabric to make sure it's going to be colorsafe.  I haven't had an issue with this, but it doesn't hurt to be careful!  If you do have a problem, you might want to try watering down your solution, or try a different brand of fabric softener.
2.  Making sure your bottle is set to "mist", hold the bottle away (6-10 inches) from the clothing, and lightly mist the whole item.  I like to do this when it's hanging, but you could also lay it flat.  If you overspray, you may leave some reisdue, so make sure you are spraying in a safe place. 
3.  Once you have misted your clothes and they are damp, lightly stretch the clothes or smooth out the wrinkles (sometimes all it needs is a good shake).  That's it!  You can leave it hang to dry, blow dry it a bit, or if not too damp just throw it on (that's what I always do!) 

That's all there is to it!  I love it because it saves so much time, cuts down on most wrinkles ** unless they are "really set in", and SMELLS great.  The best part of making it myself is I can pick what scent I want to use!  I have also used it to press things, like my pants, and have had fabulous results with this, too!

Hope you enjoy!!

Monday, August 1, 2011

Comments, part 2

I have had some luck in testing out our comment section.  What I recommend is:
If you don't have a google account or one of the other options listed, post as anonymous... you can write your name or email in your post so we know who you are.

When you try to comment, write your message, then click preview.   After you click preview, it will prompt you to type some gibberish that you see on the screen, and then you can post your comment.  I have gotten it to work twice this way, so hopefully you will be lucky too!

You can enter the giveaway 2 ways, either on the blog here, or on our facebook.  We will pool all enteries together and select one lucky winner!!

Thanks for following us!!!

Contest Change

So, since so many of you guys are having troubles posting comments here and apparently we are NOT getting it fixed on blogspot, we are going to let you all post comments on our facebook page and pick a winner Friday at noon this week!  Check out our facebook page, and comment away there.  PS, Carmen, you got your present this weekend, but if you still want the cards for being the only one of us who could get it figured out, you may! :)