Showing posts with label tuesday tutorial. Show all posts

Tuesday, November 22, 2011

Tuesday Tutorial: Christmas Cookies!!

In our family, baking and decorating Christmas Cookies is an annual tradition, one that I look forward to every year!  I thought I would share some of the tips that we have found useful over the last several years. 

So tip # 1:  If possible, Do all of this at GRANDMA'S house.  This will eliminate messy clean up for mom later on (ha-ha).

tip # 2: To save time, we bake our cookies the night before, or earlier in the morning, that way the day we plan to meet and decorate, we are able to just decorate all the cookies.  This is a family affair: we try to get to gether with as many sassysisters and sassysister-in-laws as possible, as well as our mom and grandma.  Dads are not invited, as they make too much mess, but all the sassykids come, and if they are able to eat solid foods, they help!
 Here we have the sassy family busy at work.  So some tips from this picture: Have the grown-ups or older kids frost the cookies.  I like to store all my sprinkles in a cute wire basket, that way they are ready to go and easy to find whenever I need them.  We also all bring our own containers to store cookies in, so we can bring them home.  I think we usually make 4-5 batches to accomodate this!

 Grandma (our mom) found that the easiest way to contain the sprinkles is to put cookies needing to be frosted in a pan with sides, that way they don't sprinkle everywhere.  She also conserves sprinkles by using a spoon to pick up excess sprinkles and put on cookies.  These cookies aren't as pretty, but the kids really like them!
As I mentioned before, everyone gets involved, even the little ones!  This is my niece, who's 1 in the picture.  She got 1 cookie and a bottle of sprinkles, which kept her busy the whole morning (we just kept putting more frosting on her cookie, as she licked it off.  Between the high chair tray and the pan on her tray,  not so messy!  However, I do advise giving the little ones an older bottle with fewer sprinkles... this one was pretty new, and she licked it, which made it so that we couldn't use the sprinkles.

Another tip, not pictured, is that every woman brings a batch of cookies to bake while we are there that day, that way we get a ton of cookies to bring home!

Enjoy the holidays and happy baking!

Tuesday, September 20, 2011

Tuesday tutorial: simple note pad

Today's project is this cute little "match book" note pad!  It is so quick to make, you can easily whip up several to use as party favors or gifts! 
We're going to do something a little different for this week's tutorial, and that is, we're going to send you over to my other blog, mean jean's craft machine for the tutorial.  I think followers who enjoy paper crafting and Cricut will enjoy this blog.  I plan to use my other blog to share cards, layouts, and my love of paper crafting and the Cricut.  I will have lots of tutorials or "Recipes" for making products, as well as tips and ideas for using the Cricut, craft shopping, and so forth! 

Tuesday, September 6, 2011

Tutorial: EASY monkey bread

To me, weekends mean Monkey Bread.  As a kid, I remember HATING monkey bread!  Especially when my mom made it with the carmel that had ice cream in it.  I don't know why I hated it, but I did!  Growing up, I watched monkey bread being made a lot... sometimes Grandma, sometimes Mom, sometimes my friend's moms... As an adult, I've finally come up with a recipe that I like and my kids LOVE, which combines a lot of the skills from all the monkey bread making I observed growing up.  And the best part is, It's EASY!!!

SOOOO, here's what you need:

Start with a 8x8 glass pan (or you can use a round cake pan, something shallow),
1 Roll of JUMBO cinnamon rolls from the refridgerator section
Brown  Sugar
Cinnamon
1/3 stick of butter
plastic baggie

Preheat your oven according to the cinnamon roll directions. Unwrap the butter and use it to grease your pan... coat it on THICK, because this butter is going to help make carmel.  Then you can melt the rest of the butter.


   Put some brown sugar in the plastic bag... I don't measure, I just dump it in, but I'd guess that there's about 1/2  or 3/4 cup of brown sugar in there.  Sprinkle in cinnamon (3-4 shakes, depending on how fast it sprinkles out!)  Shake up your bag to mix it up. Then you're going to cut up each of the cinnamon rolls into quarters, and throw them in the plastic baggie, shaking as you go. 

The next step: Dump it all in the pan!  The extra sugar/cinnamon mixture will turn into carmel. 

 Drizzle the melted butter on the top, then put it in the over and bake as directed on the cinnamon roll package.  My package said to bake at 350 for 25-30 minutes.  A word to the wise- do ONLY a single layer of rolls in the bottom of the pan... If you're going to double the recipe, use a 9x13 pan, don't layer it thicker, because then it doesn't cook as well. 
See how yummy and carmalized they look?
If your can of cinnamon rolls come with frosting, leave that on top of the oven while your monkey bread is baking, then drizzle it over top of the cinnamon rolls!

YUM!!!


Now they're ready to enjoy!

Tuesday, August 23, 2011

Tuesday Tutorial-ish

Well, with me on vacation and my kids starting school, and Jackie doing her canning and being a "ref-widow", we just weren't able to come up with a "real" tutorial this week!  SORRY!  Maybe Jackie will be able to come up with something for getting ink out of pants, but so far nothing is working!  I did want to share a few factoids that I learned this past week, instead:

1.  The BUTTER COW at the Iowa State Fair is 100 years old.  It was interesting to see... more impressive was the sand sculpture tribute TO the butter cow, which was on display elsewhere at the fair.  This was at least the size of my living room... talk about a "sand castle"... we were pretty impressed!  Also inspiring was the fried candy bars we got at the fair (OK, honestly I thought they were gross, but my kids liked them...)  We weren't brave enough to try the fried butter.

2.  Witch Hazel, like Crisco, can be used for a large variety of things.  GOOGLE it!  I did!  Long story short, Crisco is good for all sorts of moisturizing, and can also be used to lubricate things like bolts that are stuck.  (oh, and frying chicken!)  I was inspired to search this after watching the HELP.  (Incidentally, a very good movie, stays true to the book... read it, then watch!)  Witch Hazel is good for soothing things, as well as reducing swelling, irritation, and redness... uses include treating bug bites, acne, diaper rash, etc.  Our Sassy Stylist inspired that one!

3.  Dryer sheets, apparently, can be used for all sorts of things, too... I stumbled on this while I was searching the facts about Crisco and Witches Hazel. Tips include using it to scrub shower doors, and also to help get rid of stuck on crud on dishpans... check out this link for more information!  I'm a little sorry that I switched to dryer bars awhile back, now that I've found uses for those annoying things!

OK, I've shared some tips that I've learned this week.  Why don't you guys provide us with some tips this week, too!  Share your favorite household tip via comment below!  We're all busy and can use some fun time saving tips that we can share! 

Once again, sorry we don't have a formal tutorial today, thanks for understanding, and sharing your tips with us!

Tuesday, August 16, 2011

Tuesday Tutorial- Shower Head Cleaning

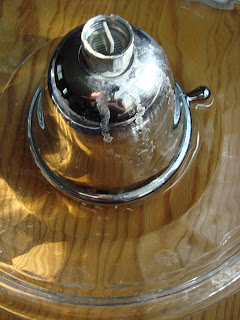
Today's Tutorial is more of an experiment.  I've noticed that our shower head was looking pretty gross,


and thought it would be fun to do a tutorial on cleaning this.  I've tried cleaning it by just spraying it with whatever I use to clean the shower, and that wasn't cutting it.  So, on to the trusty Internet I went!  I liked the recommendation to try to use vinegar to clean it!

So, the next step was to unscrew the shower head, which was surprisingly easy for me.  Then, I just put it head down into a bowl, and filled with vinegar until the head was covered... you can't really tell from the picture, but that's what's going on.

Next, I waited.  This was the easy part.  I put the bowl in the tub, made and ate supper, spent time with the family, and two hours later, TA-DA!

All I had to do is rinse and wipe with a sponge.  It was quite easy.  There are some scratches on the shower head, and the pictures don't do it justice, but, it was much MUCH cleaner than before.  I am convinced that this is a winner!

Meanwhile...
Shortly after beginning my experiment, I was talking to our Super Spunky Sassy Sister-in-law, who happens to be on maternity leave.  She's getting a little bored at home, even though baby's only about a week old. Unfortunately, she had no idea what "Tuesday Tutorial meant, since she hasn't BOTHERED to check out our BLOG yet!!!!   SHAME SHAME SHAME!!!!  OK, we'll forgive her, but only because our sweet  sassy niece is so cute!  (She does follow us on facebook... which is also in her favor!  BTW, did you KNOW you could follow us on facebook?)  I was telling her of my adventures in vinegar, and she was sad to say that her shower head wouldn't screw off.  As we were talking, she remembered that Ketsup contained lots of vinegar and other acidic materials.  She also remembered that Ketsup would take crud off pennies and make them all shiny!  So, needless to say, she decided that she would do her own experiment, and send me pictures!

So here's some shots of her adventures!

before....

covered in ketchup... got fries??


after... note the shine
 Spunky Sassy Sister in Law said that she actually did 2 applications, waiting about 1/2 hour between each... She said she just wasn't patient enough to wait to see what happened!  Needless to say, first application wasn't enough!  I think would have had favorable results if she had waited 1-2 hours before rinsing/wiping off the ketchup! 

Happy Adventures!

Tuesday, August 2, 2011

Tuesday Tutorial.... Wrinkle Releaser!!!!

I love, love, LOVE wrinkle releaser.  Unfortunately, when you have a family of 4 using it on  ALMOST EVERYTHING, it gets kind of spendy...

My Darling Husband suggested that maybe I cut down or stop buying it, but I just can't give it up... so I had an ah-hah! moment one night... Figure out how to make it myself!!!

As with almost everything I decide I'm going to learn how to make, I searched the internet for recipes.  After reading about 10 recipes/suggestions, this is what I came up with:

Supplies:


Spray  bottle - there are several options for this.  My original recipe is to use the original wrinkle releaser bottle... this is about 33 oz.  But for those of you who do NOT have an original bottle, I also will include instructions for a smaller size (16 oz)
funnel (handy for pouring ingredients into the bottle (optional)
-. bottle of liquid fabric softner, any size, scent, brand.  I use the generic brand from Target.
-  water

1.  Start out with an empty spray bottle.  Make sure it does the wide "mist" spray!
2.  If you are using the big 33 oz bottle, pour in 1 capful of fabric softner.  If you are using the 16 oz bottle, pour in 1/2 a capful.


3.  Fill the rest of the bottle with water
4.  put lid on and shake


That's it!  You now have a handy dandy bottle of wrinkle releaser!


NOW, for those of you who have never been introduced to the magic of wrinkle releaser, this is how you use it.
1.  start with wrinkled clothing.  If you haven't done so already, test an inside, unnoticable piece of fabric to make sure it's going to be colorsafe.  I haven't had an issue with this, but it doesn't hurt to be careful!  If you do have a problem, you might want to try watering down your solution, or try a different brand of fabric softener.
2.  Making sure your bottle is set to "mist", hold the bottle away (6-10 inches) from the clothing, and lightly mist the whole item.  I like to do this when it's hanging, but you could also lay it flat.  If you overspray, you may leave some reisdue, so make sure you are spraying in a safe place. 
3.  Once you have misted your clothes and they are damp, lightly stretch the clothes or smooth out the wrinkles (sometimes all it needs is a good shake).  That's it!  You can leave it hang to dry, blow dry it a bit, or if not too damp just throw it on (that's what I always do!) 

That's all there is to it!  I love it because it saves so much time, cuts down on most wrinkles ** unless they are "really set in", and SMELLS great.  The best part of making it myself is I can pick what scent I want to use!  I have also used it to press things, like my pants, and have had fabulous results with this, too!

Hope you enjoy!!

Tuesday, July 26, 2011

Tuesday Tutorial: Homemade Cookies-n-Cream Ice Cream

pillowcase dresses 072
This summer we purchased an ice cream maker.  Talk about an easy and fun thing to have at home!  I never dreamed making ice cream would be such a piece of cake!We have tried several recipes already, but so far I am quite sure this is the favorite.  This recipe can be found on the Tasty Kitchen in the Pioneer Woman’s website if you would like the original. 
Freeze your ice cream bowl prior to starting your recipe, as it is very important that it is completely frozen in order to make the ice cream come out right.
Begin by adding the milk and sugar to your mixing bowl, and mix with a whisk until all of the sugar dissolves. Add in the vanilla extract, and the heavy cream. Assemble your ice cream maker, and turn it on, adding in your ice cream mixture.
Let the mixer spin for at least 30 minutes, adding the crumbled Oreo cookies about 25 minutes into mixing. It is seriously that easy.  Our Cuisinart ice cream maker (found on Amazon quite reasonable) has an opening at the top for mixing the ingredients in and it really worked very well as you can see.  Place the bowl back in the freezer for at least an hour or overnight (although who can resist a taste right out of the mixer, it’s pretty good this way too, more the consistency of soft serve). Scoop and and enjoy.  Makes about 4 cups, fits just perfect into our ice cream maker.  For a whole load of other good ice cream recipes check out the tasty kitchen website.  If you can dream it, it is probably on there!
 

Ingredients

  • 1 cup Whole Milk, Cold
  • ¾ cups Sugar
  • 2 teaspoons Vanilla Extract
  • 2 cups Heavy Cream
  • 10 whole Oreo Cookies, Crumbled
  • Jeana's note:
    Why stop with oreos?  wouldn't this be yummy with your favorite girl scout cookies crushed inside, or a yummy butterfinger candy bar???

Tuesday, July 19, 2011

Tuesday Tutorial-Sugar Scrub

How would you like to learn how to make a fabulous body scrub that leaves your skin feeling silky smooth?  This one will whip up in minutes!  I have scanned and studied several online recipes, and this is what I've come up with:

Materials you will need:
1/2 part Baby oil with Vitamin E and Aloe
1 part sugar (can use any kind, I like to use a more "gritty" sugar, like brown)
essential oil (optional, however vanilla or honey almond mix nicely with the scent of the brown sugar)
container to put it in, such as glass jar, etc.

Step 1: Pour sugar in your container, then pour oil on top.  Mix well, and add several drops of essential oil, until scented to your preference.  

Step 2: enjoy a hot bath (with candles and a good book!), and rub the scrub on just before getting out, then rinse! 

Step 3: enjoy your soft silky skin!

That's all there is! 

A few tips:
Brown sugar has a sweet smell that is pretty strong.  If I am doing a scent such as vanilla or almond, etc.  I don't worry about this.  If I am doing a floral scent I would try mixing 1/2 brown and 1/2 white sugar, or just using white sugar, as this is not as strong of a scent (OR, just use more essential oil)

I have noticed that the oil somewhat separates from the sugar and sinks to the bottom of the jar, just give it a good shake  before using!

If using with a shower keep your jar out of the spray so that you don't get a bunch of water in it!!

Many people (including me) prefer not to use glass jars next to the tub because of breakage.  I often use plastic freezer jars I find in the canning section, or can use any other type of food storage container... Just need something with a lid that will stay on!
Hope you enjoy it!
-Jeana
Jackie's notes:  not only does this leave your skin feeling smooth, but it works really good for shaving your legs too!  I tend to use mine in the shower, else you leave with a greasy slippery film all over the tub!